
VA Instructions
Setup
Be sure that the cordset is screwed tightly into the bottom of the still to prevent leaking.
Mount the still and condenser on a secure stand. A large three-finger clamp or band clamp for the still, and a smaller three-finger clamp for the condenser work well. The ground glass joint connection between the two should be greased with stopcock grease. Secure the still first, connect the condenser, then secure the clamp to the condenser and stand, so that there is no torque applied between the components.
Our basic heating coil is intended for use with 110 V AC current, standard for North America.
Slight variations in voltage are common, and altitude may affect the boiling point. For best accuracy, we recommend using a voltage regulator such as a “Variac”, rated at 10 A or better works well, to tweak the voltage to the coil so that the required volume of distillate is delivered in ten minutes. A rolling boil, to distill 100 ml in ten minutes, is the target. This may mean a voltage as low as 90 V. Test this with a blank run prior to actual wine testing.
We also offer coils for 220V AC, for use in the rest of the world. The same advice regarding voltage regulation applies.
Connecting the condenser to the aspirator. Cooling water in introduced at the bottom of the condenser. From the top of the condenser, connect to the horizontal inlet tube of the aspirator. The cooling water is finally drained from the bottom of the aspirator. Leave the aspirator stopcock closed to perform the samplings. With the cooling water running, opening the aspirator stopcock drains the contents in the sample chamber.
From the bottom of the still. Connect a single hose to the drain (with clamp), or optionally insert the T into the hose at the bottom (as shown on the right), with one hose coming from the distilled water source and the other to the drain, with clamps on each.
Click images on the right to enlarge

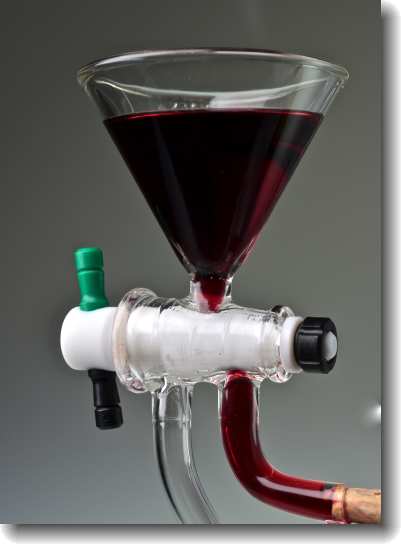
Fill the round boiling chamber at least half full with distilled water. Be sure that the heater coil is covered by an inch of water at minimum. You can fill the chamber either via the funnel and the two way stopcock as shown on the right - through the lower arm of the stopcock (the stopcock handle is angled to indicate which way it will flow), or if you have the T inserted at the bottom, you can fill from there (close the drain clamp, open the distilled water source clamp).

Turn on the cooling water. Make sure there is adequate flow to drive the aspirator: add a little distilled water to the sample chamber via the two way stopcock, through the upper, inner arm, then open the stopcock leading to the aspirator; the aspirator should suck the water out of the chamber. If not, increase the flow of the cooling water until it evacuates easily.
Close the aspirator stopcock. Add the degassed wine sample to the sample chamber via the two way stopcock, through the inner arm, leaving the stopcock open. Place a clean 100 ml volumetric flask under the condenser to collect the distillate. Turn on the power to the heating coil. Leave the inner arm of the two way stopcock open to vent CO2 for about 20 seconds after the water starts boiling, then close it to start distillation of the sample. Collect the appropriate amount of distillate, generally 100 ml. Turn off power. Transfer the distillate to another flask to titrate.
Open the outer arm of the two way stopcock, to equilibrate the boiling chamber, and open the aspirator stopcock to extract the spent sample. Rinse the sample chamber: close the aspirator stopcock, add distilled water to the chamber via the two way stopcock, open the aspirator stopcock, suck out the rinse; repeat until clean.
Check the level of water in the boiling flask, add more if necessary. Do not allow the level to go so low that the heating coil is exposed. If the flask runs dry, and is still hot, do not add water. Turn off the power and let it cool slowly; if you add water to a hot flask it will crack. Damaged stills can be repaired, but damage is avoidable.
Repeat the sample test cycle again; the water in the boiling chamber will still be quite hot, so the time is shortened considerably.